Showing posts with label tutorials. Show all posts

Monday, May 21, 2012

Drawstring Bags - tutorial

I love bags. A lot.

Especially now that I'm knitting more and need more project bags. There are different types I like for different purposes. Let's take a look at the Drawstring Bag.

I've looked at a lot of tutorials online to try to come up with the perfect drawstring bag. I wanted to be able to make it in any size and use any fabric I like. And while I love math, I didn't want to have to work it out every time I made a bag or changed the sizing.

So, I made a Spreadsheet:

You just fill in the numbers in the first (green) table and watch the other numbers change. Since I wanted to have various options I had to make various tables.

Here's a visual for what each one means:

Bag Options: 

Outer Fabric:
A - One main piece, direction doesn't matter. This is the easiest!
B - Two main pieces, direction matters.
C - Two main pieces, and a base. In this case you will need to outer main pieces even if the direction doesn't matter.
D - Two main pieces, and two bases. Use this if the base direction matters. Again, the main piece can be directional or not.

Lining:
1 - One piece. This is the easiest. Regardless of what is happening on the outside you can use this.
2 - Two pieces. Only use this if the fabric is directional. You'll only see the very top of this fabric so I'm not sure you really need to use this - UNLESS, you want the bag to be completely reversible.

Now, using all that we can make a bag - or 20. Here's how:

Instructions:
These are really general directions for completing a bag. For each step you have many options for customization.


1. Use the Spreadsheet and enter in the final measurements for your desired bag. Only change the numbers in the first (green) table.

I had some scrap fabric that was 11 inches wide,
so I played with the numbers in the "green" table
to get a cut fabric width of 11 inches.

2. Decide what configuration of outer and lining fabric you would like.

I decided on just one outer and one inner piece.

3. Refering to the appropriate chart, cut out all your fabric pieces. The measurements include your final seam allowance(s).


4. Sew into a big "tube" following the schematic above for outer and lining configurations. Remember:
     -- Always sew with Right Sides Facing (RSF).
     -- Watch the direction of your prints, if direction matters.

Optional: I like to stitch the seam toward the lining -


5. Line up the outer and lining pieces, RSF, and mark your drawstring opening(s) on your main fabric. Sew both open sides, leaving drawstring opening free and about 2-3" free in one side of the lining, for turning.
     -- Think about the thickness of your drawstring when marking the opening. I like 3/4" which works for just about anything.
     --  Be sure to back-stitch at each side of the openings.
     -- The opening in the lining should be about in the center, we will be cutting out the bottom corners so don't have it toward the bottom.
     -- If you are using two lining pieces you could leave the opening in the bottom seam, toward the middle, and then not leave an opening in the side.
     -- You can use one or two drawstrings. Plan openings accordingly.


6. Using the "corner" measurement from the chart, mark and sew all four corners. Trim to match seam allowance. Note: this measurement is the distance from the point to the line you draw.
     -- I find it easier to press the fold.
     -- I just use a pencil to mark.

7. Turn your bag through the opening in the lining, "pointing" all corners. Sew the opening in the lining shut.
You could sew the lining shut
by hand if you want the bag
to be completely reversible.

8. Tuck the lining inside the outer fabric. I like to iron the top seam.

8. Sew the channel for the drawstring(s) by stitching on either side of the opening you made. You can use a straight stitch or a decorative one.

9. If you are making your own drawstring, do that now.

10. Thread the drawstring(s) through the channel.

Enjoy your bag!

Wednesday, March 16, 2011

Cricut 201 Project {Name Chipboard Book} Part 2

Project Steps:
Part 1A - Creating the first page
Part 1B - Completing the design
Part 2 - Cutting the Chipboard <----You are here
Coming soon:
Part 3 - Cutting papers and embellishments
Part 4 - Putting it all together
My "James" book cut out of chipboard.


You will need:

Last time we set up your project in SCAL so that it was ready to go. To cut your chipboard you will need to
  • Cut your chipboard to the right size. I like to reuse old boxes for this. Cereal boxes work great!
  • Load it up on your mat and then into the Cricut.
  • I use the following settings - Blade: 6, Speed: 3, Pressure: 5.
  • In SCAL set the cutter to "Multi-cut" 3 times.
  • click image to see larger.
  • Select "cut" at the top of the screen. (The scissors)
  • Be amazed at the results! I had to set mine up in two different "pages" in SCAL and cut it in two different sets. You may also have to do that depending on the size of your pages. Check out the last post if you need help with setting it up.
Each page of my "James" Book.

The back side of each page. Cereal boxes = cheap!
Next time we'll talk about cutting the papers to cover this chipboard and any embellishments we'll be using. Come on back!

    Thursday, February 10, 2011

    Cricut 201 Project {Name Chipboard Book} Part 1B

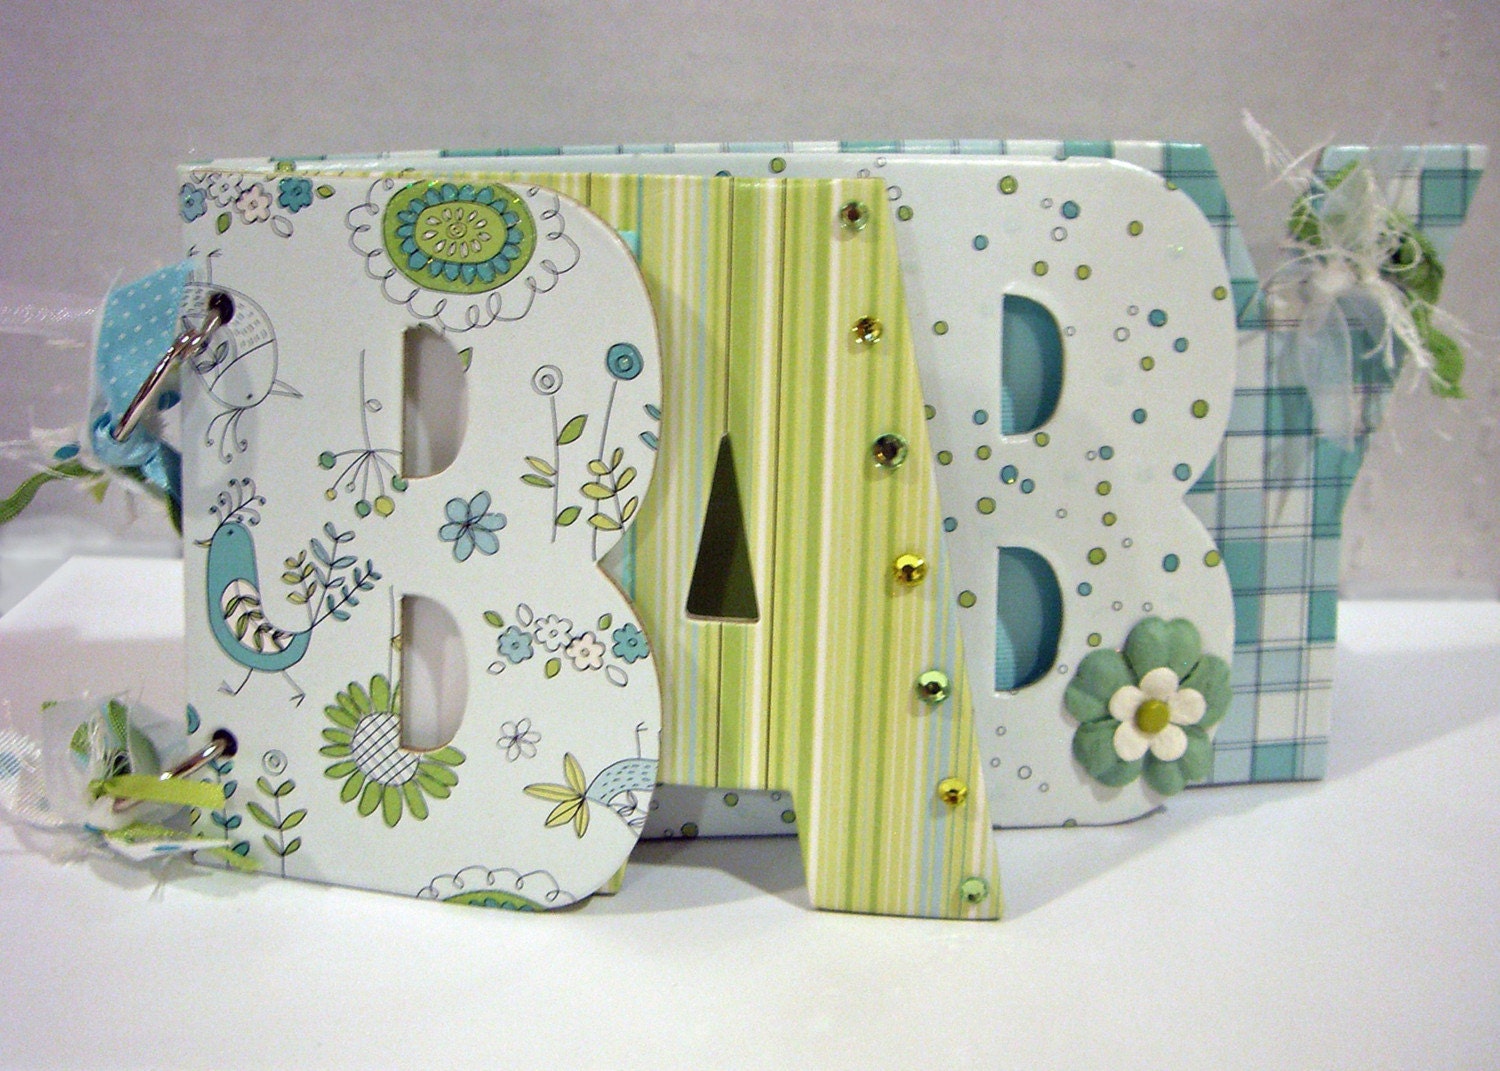
    Let's finish designing our Chipboard "Baby" book (or any other word you want)!

    Project Steps:
    Part 1A - Creating the first page
    Part 1B - Completing the design <----You are here
    Coming soon:
    Part 2 - Cutting the Chipboard
    Part 3 - Cutting papers and embellishments
    Part 4 - Putting it all together

    We are using Inkscape - a free vector graphics editing software. If you haven't yet, go download it right now!

    In this video we'll finish up our digital design by creating the last few pages. We'll look at some issues with fonts and nodes.


    Finally, we'll get it ready to cut in Sure Cuts Alot 2.


    Post any questions you have in the comments below. I will be posting more over the next few days. Come back often!

    ♥Julliana

    Saturday, February 5, 2011

    Cricut 201 Project {Name Chipboard Book} Part 1A

    Let's use what we know about file types and create our own letter chipboard book. You can make any word you want, and use any font you want to totally customize it. This will be a multi-part project. In the end, we'll end up with something like this...

    Baby Book
    or this...
    Friend Book
    it's up to you!

    Project Steps:
    Part 1A - Creating the first page <----You are here
    Coming soon:
    Part 1B - Completing the design
    Part 2 - Cutting the Chipboard
    Part 3 - Cutting papers and embellishments
    Part 4 - Putting it all together

    Let's get started. What you'll need:


    Feel free to post any questions you may have in the comments below. I will be posting the rest of the process over the next few days. Come back often!

    ♥Julliana

    Friday, January 14, 2011

    Cricut 201 {# 1} Understanding File Types

    Whatever happened to 101? I'm not going to be talking about basics - so we are skipping ahead to the intermediate level. I'm assuming you have the following:
    • Cricut - any kind will work. You should also have the USB cable that allows you to attach it to the computer.
    • Sure Cuts a Lot - (abbreviated SCAL) this software allows you to cut out any font/dingbat/clipart you have on your computer...no need to buy expensive cartridges.
    • Inkscape - A free vector graphics editor that gives you even more freedom in creating your own cutting files.
    • A computer - should go without saying, but I said it anyway.
    Today we are going to take a look at different file types so we know what we are dealing with when we create our own cutting files for the cricut. 

    ¨¨¨¨¨°º©©º°¨¨¨¨¨¨¨°º©©º°¨¨¨¨¨°º©©º°¨¨¨¨¨¨°º©©º°¨¨¨¨¨¨°º©©º°¨¨¨¨¨¨°º©©º°¨¨¨¨¨°º©©º°¨¨¨¨¨¨¨°º©©º°¨¨¨¨¨°º©©º°¨¨¨¨¨¨°º©©º°¨¨¨¨¨¨
    Warning: Totally boring awesome computer techno geeky stuff coming up!
    ¨¨¨¨¨°º©©º°¨¨¨¨¨¨¨°º©©º°¨¨¨¨¨°º©©º°¨¨¨¨¨¨°º©©º°¨¨¨¨¨¨°º©©º°¨¨¨¨¨¨°º©©º°¨¨¨¨¨°º©©º°¨¨¨¨¨¨¨°º©©º°¨¨¨¨¨°º©©º°¨¨¨¨¨¨°º©©º°¨¨¨¨¨¨

    Bitmap - a map using bits...for real. Basically it is a file that describes what each bit (point/pixel) looks like. Both JPEGs and PNGs are Bitmaps.

    JPEG
    A JPEG is a file that uses pixels to describe each point. Basically, its made of bunch of squares, each of which is assigned a color. When you zoom out far enough, you see the whole image, not just a bunch of squares. That's why for a while everyone was obsessed with mega-pixels on cameras. You wanted more because this meant your photos had more pixels and were therefore higher quality. This file type is perfect for pictures but doesn't really work for cutting because you can't really change the size of it easily without losing quality.

    JPEG at normal size.

    JPEG at 500% zoom. Notice the pixelated edges.


    PNG
    Similar to JPEG in that it is made up of pixels, but PNGs use better compression so there is less loss of data when saving. Also, it allows for transparency so you can have "clear" backgrounds or "holes" in your image. In a JPEG every pixel has to be assigned a color (so you would sometimes use white for the background, or try to match the background of your webpage) but in PNG you can have "blank" pixels.

    Most programs can auto-trace an image (jpeg or png) and get you a pretty good cutting file depending on the contrast between the pixels.

    SVG
    SVG means Scalable Vector Graphics. A vector is a mathematical description of a point. Basically it describes the location of parts of an image based on mathematical equations rather than assigning colors to points. The beauty of this - besides the mathematics of it all ;) - is that it is scalable (you can multiply/divide it). When you want to change the size of an svg you don't lose any data...its just multiplied. With JPEG the computer would have to "make up" what the new pixels would look like because there is no data. With SVG, there is always data because the equation just spits out a new number.
    svg file at 500% zoom. The edges are sharp and clear. This makes it easier for cutters to work with.
    Font Files
    You can find lots of fonts (and dingbats) online for free! Most fonts are TrueType or OpenType fonts. These fonts are actually vector images, so all vector principles apply. It's easy for SCAL to "trace" a font because it's not really tracing it...its just using the vector paths like it would with an SVG file.

    ¨¨¨¨¨°º©©º°¨¨¨¨¨¨¨°º©©º°¨¨¨¨¨°º©©º°¨¨¨¨¨¨°º©©º°¨¨¨¨¨¨°º©©º°¨¨¨¨¨¨°º©©º°¨¨¨¨¨°º©©º°¨¨¨¨¨¨¨°º©©º°¨¨¨¨¨°º©©º°¨¨¨¨¨¨°º©©º°¨¨¨¨¨¨
    End of totally boring awesome computer techno geeky stuff.
    ¨¨¨¨¨°º©©º°¨¨¨¨¨¨¨°º©©º°¨¨¨¨¨°º©©º°¨¨¨¨¨¨°º©©º°¨¨¨¨¨¨°º©©º°¨¨¨¨¨¨°º©©º°¨¨¨¨¨°º©©º°¨¨¨¨¨¨¨°º©©º°¨¨¨¨¨°º©©º°¨¨¨¨¨¨°º©©º°¨¨¨¨¨¨


    Okay - so was that totally boring?

    The reason you need to understand file types is because we will be using each different kind for different reasons when we use our cricut. Join me next time when we will continue our investigation and create a super fun project.

    Monday, September 13, 2010

    "My Little Man" Ties

    I am in! I will be competing on Season 5 of So You Think You're Crafty! In fact, I came in second in the voting...how exciting! Thanks for all your votes. As promised, here's the tutorial:
    - - - - - - - - - - - - - - - - - - - - - - - - - - - - - - - - - - - - - -
    It's so unfair that girls get all the cute accessories. What's a mother of boys to do?
    Make Ties!


    First, download and print the pattern.

    Materials Needed:
    outer fabric - 1/2 yard printed woven fabric.  quilting cottons and home decor fabrics work well.
    lining fabric - 1/2 yard solid woven fabric.  quilting cotton works well here. lightweight is best.
    interfacing - 1/3 yard lightweight interfacing. you don’t need this if you are using a heavy outer fabric.

    Pattern Pieces:
    Seam allowance is NOT included in the pattern. I recommend you add about 3/8” seam allowance. Feel free to add more or less. {tip: This is a good place to make the tie wider or narrower. for example, you could add a 5/8” seam allowance and sew with a 1/4” allowance.}
    #1 - narrow part of tie
    cut 1 of main fabric
    cut 1 of interfacing (optional)
    cut 1 of lining
    #2 - wide pard of tie
    cut 1 of main fabric
    cut 1 of interfacing (optional)
    cut 1 of lining

    Instructions
    Cutting:
    Make sure to add seam allowance.
    * Cut both pieces from outer and lining fabrics. {note: The “straight of grain” is on the diagonal so the pattern of the fabric will run diagonal, or on the bias. Really, you don’t have to do this, it just helps the fabric curve easier.}

    Sewing:
    * Iron the interfacing to the wrong side of the outer pieces. {note: This is optional. If you are using a heaver outer fabric (i.e. home decor) you don’t need interfacing. Just follow the manufacturer’s instructions on this.}

    * Stitch lining pieces together, and outer pieces together, at the center joint seam, right sides facing. {tip: overlap the points by by your seam allowance.}

    * Next, pin the lining to the outer fabric, right sides together, and sew around the entire tie ... that’s right, the entire tie ... trust me!

    A note about perfection: Get over it! It will all work out in the end. Here are some "mistakes" I made -
    my seam allowances weren't cut perfectly...oh well, once you stitch and trim your seams it won't matter!
    also, I sewed the seam folded down...again, it won't matter when the tie is turned inside out.
    Basically what I'm trying to say is its okay if this isn't perfect. Its not a wedding dress, its a little boy's tie.
    * Clip corners. {tip:If you used a larger seam allowance you may also need to trim your seam allowance a bit. It should be about 1/4”-3/8” wide.}

    * Now the tricky part. Cut a small slit in the lining fabric running the length of the tie...make this a few inches long. This is how we will turn the tie out. Don’t worry we won’t see this at all!

    * Turn the tie out, poke out the corners, and press the seams.

    * While you are at the iron, press the sides of the tie toward the center back. I like to use steam for this to make it a really crisp fold. (watch your fingers!)

    * Use a few hand stitches to tack the two sides together...or...use fusible webbing and don’t bother with the hand sewing! {note: if you need some help, check out my hidden hand stitches tutorial}
    Now admire your handy work...track down your young man and tie one on him.

    How dashing!

    ♥ Julliana

    Thursday, September 9, 2010

    Kid's Apron

    Getting Ben ready for "pre-pre-school", means making him an art apron.

    Oh, how adorable!

    Best part - cheap and washable! Here's how.

    First, download the pattern. Print this out on cardstock and cut it out.

    Materials Needed:
    • 1 tea towel.
    • bias binding, ribbon, rope, whatever you want to tie it on with.
    • Any additional embellishments. Again, ribbons, appliques, bows, flowers, etc.

    Tools Needed:
    • Scissors
    • Ruler
    • Sewing Machine
    • Safety Pin
    • Pencil or Fabric Pen

    Instructions:

    Basic Apron Shape
    First print off the template for the "arm holes". I've included both an adult and child size. Choose your size.
    Use the template to trace and then cut off the two top corners of the apron (shorter width across the top). Flip the template over to cut the left side.
    Note: the tea towels aren't perfectly square...so what...neither are we. Just fudge it a bit.

    Now, press this cut edge under about 1/4 inch. Again, don't freak out about being exact...this is an apron...it will get messy. Besides, the pattern on the towel hides a lot of sins. :)
    Press the edge under again about 3/4 inch. This will make the casing for the ties. If you want to use a thicker ribbon you may consider making this second fold a bit larger...or let the ribbon bunch in the casing...either way, super cute!
    Do this to both "arm holes". Watch your fingers and the hot iron...I like to use steam to really press it good.
    Sew close to the edge of your casing. I like to sew from the wrong side (inside) so I can see the edge. I also like to back-stitch at the top and bottom.

    Kid's Size Apron
    (the adult size is the full length of the tea towel - skip to making the ties)

    To make the pocket: Fold the towel up 9" from the bottom. You may wish to decorate this edge with ribbon or ric-rac or whatever. I just used some store bought bias tape.
    Once you've decorated your edge, fold it up again (toward the armholes) to create pockets about 4" deep.
    Now you will sew your pocket down. Decide how wide you want your pockets and sew a straight stitch through all the layers, back stitch at the beginning and end. I also sewed right near the left and right edges of the apron. you may wish to just follow the hem line. My sewing lines are below in pink.
    At this point you could also add appliqué to the top part or some cute ribbon or trim to the bottom edge. I'm making this for a boy so I didn't use any frills.

    Making the Ties (for kids and adults)
    I used store bought bias tape. Cut about 84" of bias binding and sew along the open edge. If you are using ribbon, you won't need to sew it.
    Thread through the casing (using a safety pin) leaving a loop at the top for the neck. I tied the ends of my ties, but you could hem them. I figure, it's a boy's apron and the fraying would be okay.

    Enjoy!

    ♥ Julliana