Monday, November 14, 2011

FO: Opposite Pole Cardigan

So, this is love...


Project: Opposite Pole 
Pattern: by the brilliant Joji, on ravelry
Yarn: Lion Brand Wool-Ease (Color: Natural Heather)
Needles: US 9 (5.5 mm) for the back, US 10.5 (6.5 mm) for the circular part and sleeves.


Since I used LB Wool-Ease, which I love, and it contains so much acrylic (80% acrylic/20% wool) I was concerned about how to block it.


It actually looked pretty good pre-blocking but I wanted it to look great. I just wasn't sure how to block it. Then I found Bead Knitter's Tutorial on how to block acrylic. The key is to steam block.


So, I just laid it out, pinned how I wanted it, then took the steam iron to it. If you do this, remember to NOT touch the fabric with the iron - it could burn it! It was amazing to watch the fabric change before my eyes...it would kind of shift and adjust as it settled. Now, I can machine wash and dry it without it changing.


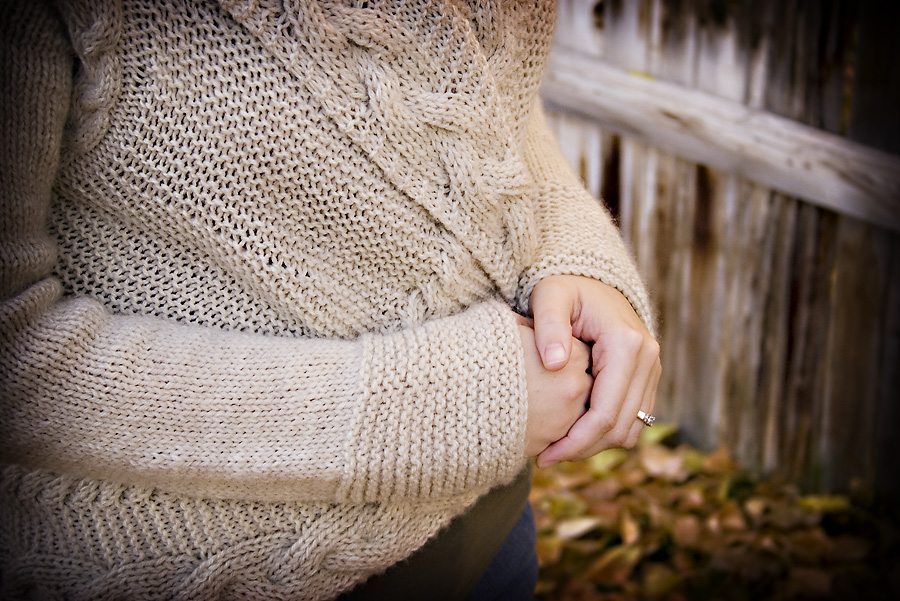
I decided to use the 10.5 on the sleeves because I really liked the stockinette fabric it created, so I made a size smaller sleeve because my gauge was bigger than the pattern called for, and it turned out perfectly. The short-row top-down sleeve is brilliant! I ended up doing 2 more increases, and associated length, on the sleeve before changing to garter stitch. I disliked the way the garter stitch looked using the 10.5 needles - it was much wider than the st st, and I wanted a tight cuff so I switched to US 8 DPN's for the cuff and then to US 7 DPN's for the last 4 rounds and bind off.


I am so happy with this cardigan! I wore it to church and it was nice and warm. I'm glad I went with the neutral color so i can wear it with everything...and I will.


Ben sure had fun while Troy took these pictures - - He dressed himself in his PJ's and sandal's during nap time.

Saturday, November 5, 2011

FO: Lilas Cardigan

Fall leaves on the ground. First snow fell today. Some fell on me from the large tree in the neighbors yard, thus the white flecks.
Project: Lilas Cardigan
Pattern: from Ravelry
Yarn: Knit Picks Wool of the Andes (Color: Papaya Heather)
Needles: US 7 (4.5 mm)
I ordered this yarn in February and didn't even start on the knitting until May. Then, I just took my sweet time with it. I worked on in during class this summer. I worked on it a bit at home. And finally, it was done.
Then I took my sweet time getting it blocked...not until the end of September! I just wet it in the bathtub, carefully squished out some of the water before wrapping it in a bath towel. Then I put it in the washing machine spin cycle for about 20 seconds to get most of the water out. I even used my new blocking wires on it.
Part of the problem was that I made this out of wool. The yarn was nice and knit up well but it is hot! This is not a summer cardigan as the pattern (made in cotton) suggests.
But that's okay, I love it as a layering piece. I wore it to church once and I was warm even though they cranked the air conditioning. It was like wearing a blanket!
I just wear it open, because I don't quite know how to close it yet. Plus, the huge collar adds bulk to my already generous bust.
I love the color, a nice rich pink with undertones of yellow.

Friday, November 4, 2011

Singing Block

Ben's been struggling with singing time. Its part of our bedtime routine and lately he's been fighting it. Maybe its because he knows its bedtime. Maybe its because we are trying to get him to engage with us more by sitting on the blanket and doing all the actions. Whatever it is, we've decided to change it up.
I made a singing time die that we can take turns tossing. Each of us will get one toss, so four songs a night. This should at least bring him back to the group between each song...so he can see what the next song is. By making it more of a game I think it will help him deal with an inconsistent song order.
Want one too? Here's what you need to do.

  • Download the svg file, or the Sure Cuts A Lot 2 file.
  • Cut the pieces out of cardstock. You may want to change the square's to perforate if you are using the svg file. (its already done on the scal2 file)
  • I made pictures for each side using clip art and the song title. I then used markers to make it nice and colorful. I just attached them with scrapbook glue. 

Here's how it goes together.

  • I chose to laminate mine so I did that first.
  • I used hot glue to complete the box.
Enjoy!

Thursday, November 3, 2011

Give Thanks ... and eat

I'm getting ready for Fall and Thanksgiving by changing up my decorations.
I wanted some vinyl on the wall by my shelves. I only had two smallish pieces of brown to work with so, here's what I came up with.
I got it all ready to go and then, had major problems.

First, I didn't change the settings on my Cricut from when I cut out cardstock, so I cut all the way through the vinyl...Had to carefully get it on the transfer paper.

Then, when I put it up, I didn't love how the "and" was so close to the "eat". I also took off two of the dots...because I didn't place it right.

So, I used two little scraps...all I had left, to get a new "and" and dots.
I've been using a pot scrapper to help transfer the vinyl...it looks gross, but I promise its just hard water spots from the dishwasher.

And here's the final result:

You can cut this too! Just download the svg file and cut it on your Cricut. I had to split mine into two pages, one for "Give T" and another for "hanks" and the rest.

Wednesday, November 2, 2011

Fall Table Runner

I started this thing ages ago (that's a common theme with me) but it was just languishing in my sewing drawer. When I first started the quilting on it, somehow my tension was completely off and I couldn't fix it. At the time I was also working on my son's blessing outfit so I knew it wasn't just this project I was struggling with. So, I sent the machine in for a service. It came back great and I finished the blessing outfit but never got back to this quilt.
I did the binding on the machine and it turned out okay, not great. I followed this Quilt Binding Tutorial. I think if I bind on the machine again I'll have to either try harder to make it even, or get a binder foot attachment.
 I did the machine quilting myself and am quite proud of it. I used some cream thread and my darning foot. My stitches aren't very even (this is the best block) and my swirls are mostly awkward, but it was so fun! I am desperate to quilt something else - maybe a potholder?
I love the ricrac trim. I used matching thread and it turned out really nice.

Lessons Learned:
  • Don't leave scissors lying around next to the quilt. Yes, Ben did cut about one inch into the quilt. Oh, well. That is the first time he's used the scissor successfully on his own...I guess that's a good thing. I just zig-zagged it together. The binding actually covered up about half of it...it adds character. :)
  • Don't let the boys touch the sewing machine. Or even look at it, or think about looking at it. Ben actually put a button inside of the machine. Don't ask me how he did it, but it happened. I took the cover off to put oil in it and found a 1 inch button inside!
  • Cut the back larger than the front. I cut it the exact size and in the quilting process it shrunk a bit. I had to trim the quilt a bit smaller, and it was no big deal, but next time I'll be sure to leave extra backing fabric.
  • Even though I'm using the darning foot - presser foot must be down! Twice I didn't drop the foot, which is an easy mistake to make since the darning foot doesn't actually touch the quilt top. This caused the stitch tension to be off (of course on the backside so I didn't notice for a while) and I had to rip out two large chunks of work. 

Tuesday, November 1, 2011

Halloween Bats

Inspired by Dana at Made, I wanted to have bats too. So, I cut out a bunch on my Cricut and had Ben help me put them up.

Ben's arrangement of the bats.
I adjusted them a bit after Ben was done. We just used cardstock, bending the wings forward a bit. I used regular scotch tape to attach them to the wall. Over the next week they would keep falling off. It gave Ben something to do.

Full view.
I finally had Troy put the shelves back up and put the rest of the Halloween decorations up. I still have to touch up the shelves, but it looks pretty good for now. Now, it's time to switch into Thanksgiving.