Sunday, October 24, 2010

What a Crazy Week

Its been a wild ride! Last Monday I was admitted to the hospital due to complications with my pregnancy and on Thursday, baby James decided it was time to be born...even though he wasn't due until January. He will be in the NICU for a few months but is doing well and I am also recovering well.
Needless to say, crafting will be taking a backseat to other needs for a while. I'll post updates on my personal blog but will probably be ignoring this one for a while. I'll leave you with this cute little card I made for him:
Based on a cute one by Frilly Milly.
♥Julliana

Tuesday, October 12, 2010

Halloween Boo! Banner

I am thinking that I need to package my digital files to share with everyone. They’re already made…I might as well. So, I’m going to share some svg and scal2 files with you. (want to know what the difference is between svg and scal2…check back later this week. I'll come back and link it up once I post.) Here’s the first of what I hope to be many.


Create a stylish Halloween bunting banner with this Boo! Banner Kit. Use your favorite Halloween Cardstock (or print some digital paper) and glue it all together. It’s so easy but will really wow everyone who sees this oh so pretty banner.

Tools Used
Glue Stick
Hot Glue Gun
Paper Trimmer
Single Hole Punch
Sure Cuts a Lot 2 Software
Cricut Expressions Machine

Paper Used
{Digital Paper} Summer Driggs, Fangs for the Memories, “WebPaper” (Printed on 3 sheets of 8.5”x11” white textured cardstock)
2 sheets 12”x12” White Cardstock
1 sheet of 12"x12" Black Cardstock

Inks and Embellishments Used
Black Ink Pad
Brown Tulle
White Ribbon
Orange Ribbon

SVGs Used
2 Bracket Flag Banner Pennants
Boo for Banner
Ghost for Banner
or you could use the Scut2 file Boo Banner

Dimensions
There’s no need to re-size anything if you’re using scal2. Each shape will be imported at the proper size. Just import and cut! In case you need the sizes I used, here’s what I did.
SVG File Dimensions Paper Quantity
2 Bracket Flag Banner Pennants 9.53" width Halloween patterned cardstock Cut 3 sets (6 total)
Boo 8" height Black Cardstock Cut 1
Ghost 3.5" height Black Cardstock Cut 1
Other Cuts
Accordian Flowers 2" width White Cardstock Cut 10 strips (2 for each flower)
Remember, if you select the "maintain proportions" option in SCAL you won't need both width/height dimensions. Just one will do.

Instructions
Normally, this is where the instructions would go (maybe pictures, maybe a video?). For this one, my camera battery was dead and I was too anxious to get going on it. In the future, I’ll try to be a bit more prepared when crafting. :) For now, if you have any questions on how to do any of this, post a comment or send me an email.

Design Tips
When printing out digital paper, I set my printer to “borderless”. Check to see if your printer can do that too. If not, you may need to move your svg/scal2 files a bit so they will cut on the printed paper.
I used Jamie Lane’s tutorial to make my accordion flower.
Ink the edges of your accordion flower “petals” after they are glued together (in sets of two) to make it look more antiqued.
I used the glue stick to attach my accordion flower strips together, but I chose to use hot glue in the centers (from the back) to hold it all together.
I used brown tulle because the store was out of brown. It looks good and I can use some the left overs for fall decorating.
I attached the banner to the shelves with small thumb tacks. Tape didn't seem to work well for me.

I hope you enjoy using this banner for your Halloween decorating! I'll be sharing some more holiday crafts soon!
(Did I use enough exclamation marks ?!!!? … it would seem that I’m a bit excited about this)

♥ Julliana

Monday, October 11, 2010

"Heavy Metal" Pumpkins {Tutorial}

I've seen some cool metal pumpkins around, but they were huge, heavy and expensive. I was looking for something a bit smaller but still modern looking. Here's what I came up with.
These metal pumpkins are super cheap and easy! Here's how you can make them.

Materials:
- Hanger Strap. This is found in the plumbing department. You can get different lengths and either stainless or copper plated. I think the copper plated helps add to the "pumpkin" look. I bought 2 10 ft lenghts, one in silver and one in copper, and was able to made 3 pumpkins.
- 1/4" diameter Carriage Screws (one for each pumpkin. I used 6", 5 1/2", and 5" lengths)
- 2 nuts for each pumpkin (make sure they will fit the carriage screws)
- Tin Snips
- Needle nose pliers (not shown)

*Note: the hanger strap has two hole sizes in it. The larger size is the 1/4" hole that we'll be using. Be sure to plan on that hole when making measurements/cutting.*
*Another Note: the metal can be sharp when cut so you may want to wear gloves. Either way, be careful!*

Instructions:
Screw a nut onto the bolt to about 1 inch from the top. That top part will be the stem of the pumpkin.
Add the "leaf" next.
To make the leaf, simply make a coil around your needle nose pliers and snip it off. Thread this onto the carriage bolt just below the washer.
To make the pumpkin, you'll need to cut 4-6 equal lengths of hanger strap. For the big pumpkin my lengths were about 18". You decide how big you want them to be...think about your bolt length too. Find the center whole in each piece of strap and thread it through the bolt.
Thread the ends of each strap  though the bolt but only push it up about 1/2".
Repeat this for all your straps.
Add a washer to the bottom to hold it all on.
One hint - you'll want to bend the straps so there is a rim at the bottom. This will help the pumpkin stand up...it will be wobbly because of the washer.
bottom view of pumpkin.

You can mix and match the colors or use all of one color. You could even spray paint or glaze this!
top left: all silver, top right: mix of copper and silver, bottom: copper
♥Julliana

Saturday, October 9, 2010

How to use a template - tutorial

Today I thought I'd walk you through how to use a template as a base for your digi-scrapped page. Here's what I'm going to create.
Credits: Template: "Template 16" by Dunia. Papers: "Summer Sorbet" from DigiFile 6 by Zoe Pearn, "Spring Mini Kit" by Amanda, and "So Crafty" by Krystal Hartley. Alpha for title: "Giggle" by DigiTreats. Font: "Pea KevinandAmanda Funky" by Amanda. Overlay (edge): "Shabby Overlay" by Shabby Princess.

Now, I ended up having to make four videos...youtubes limit is 10 minutes each and I had some technical difficulties. Anyway, not all the steps are included but I thought this would at least give you an idea of how to get started. Later I can go into more specifics about certain aspects of customizing your page. This time I really stuck with the basic template. Let me know what you think and if you have any questions. Oh, and turn the volume up - it recorded the sound a bit soft.

Part One:


Part Two:


Part Three:


Part Four:

Friday, October 8, 2010

Digi-Scrapping 101 * Lesson #3

Are you ready to go? Today I'm going to walk you some basics of using Photoshop (you can download a free 30 day trial here) and how to work with your images. This is very, very basic but we will practice some important techniques.

Here's the pdf outline:


And you can also watch the videos. Note: youtube only allows my vids to be up to 10 minutes long and this one was 18 minutes long so I have to split it into two parts:

Part 1:


Part 2:


Next time we'll take a closer look at some of these tools. Enjoy and let me know what you think.

♥Julliana

Thursday, October 7, 2010

Hybrid * Recipe Cards * Freebie

My sister and I are throwing a shower for my other sister next week. The theme is recipes and we wanted everyone to bring a recipe as part of their gift. I decided to make up some basic recipe cards using my sister's "colors" so they would match her kitchen. These were included with the invitation so her recipe box would be super cute!
They turned out so well I thought I'd share! I made these very basic so the focus is on the recipe. There is a "paper strip" on the left side and room for ingredients and directions. This time I didn't include lines on the back (for longer recipes). I figure you could just write on the blank back side if you need more room - plus it saves on printing costs.
You could just type in your recipes and print these on your home computer a few to a page. I sent the file to my local copy shop and had them print up a bunch of each so I could give the leftovers as a gift to the bride.
Want to make your own? I've included my recipe cards along with a blank template so you can make your own in your own colors...or just print of mine, tie them in a bow and call it a gift!

Why is this hybrid? Well, because I can call it whatever I want! :) No, really, I call it hybrid because I printed them and will write on them...I guess if you typed and printed you could call it fully digital - in the end does it matter? They are just cute cards...don't over think it. :)

Enjoy!

♥ Julliana

Wednesday, October 6, 2010

Digi-Scrapping 101 * Lesson #2

Welcome to Lesson 2 - I hope you were able to set up all your folders as explained in Lesson 1. Today, we are going to talk about how to download your digi-supplies and your pictures. There are two videos today and one pdf. Enjoy!


Video 1 - Downloading/Filing Digital Files:


Video 2 - Downloading/Filing Pictures:


Happy Scrapping!
♥ Julliana

Tuesday, October 5, 2010

My New To Do List *Digi Freebie

I'm always making lists and have random post-its and scraps of paper all over the house. in an effort to organize everything onto one master list I've decided to make some daily lists to go on my fridge.
 Each day's list was printed on a 5x7 photo an then laminated. I punched a hole in the top so I could use a binder ring and hook-magnet to attach to the fridge.
Each day has four categories - cleaning, to do, appointments, menu. This way I can keep all my lists together! The idea is to write on it with an overhead marker (which can be wiped off with a damp cloth). I printed up two weeks worth so I can plan ahead.
I wanted cute handwritten date titles, so I made some myself using Inkscape. I highly recommend this program as a free alternative to Adobe Illustrator.

Now you too can have my handmade date stamps:

Enjoy!
♥ Julliana

Monday, October 4, 2010

Digi-Scrapping 101 * Lesson #1

Please comment below if you do use this, so I know and keep it going. Also, you can let me know what you want to learn and I'll try to accommodate you. Right now I will start at the very beginning.

Welcome to Digi-Scrapping 101


1. Watch the video. You can make it full screen if that easier. Also, don't judge...next time I'll make script.


2. Download (save) the .pdf which includes all the information you need.


3. Comment below and let me know what you think. If you have any questions you can also post them in comments and I'll respond.

Enjoy!

♥Julliana

Sunday, October 3, 2010

What is Digital Scrapbooking?

I've been waxing philosophical after listening to a few of the Paperclipping Digi Show podcasts (which by the way I highly recommend) I decided to start listening at the beginning. The topic for the show was "What is Digital Scrapbooking Anyway?" So I've been thinking, what is digital scrapbooking? I consider myself a digital scrapbooker but haven't really thought about the definition of it, why I do it, etc. (Oh and on a side note, while discussing definitions - its funny that my spell check doesn't recognize scrapbooking as a word :) )

To me, digital scrapbooking is just scrapbooking. It is my way to preserve my memories. To me the "how" is less important than the actual memory keeping. For clarity's sake though, and since we hear the term a lot, perhaps the does need to be a definition. Here's what I've come up with.

Traditional Scrapbooking - using printed photos and physically journaling (hand written, rub-ons, stickers) along with embellishments and memorabilia to create a memory album.

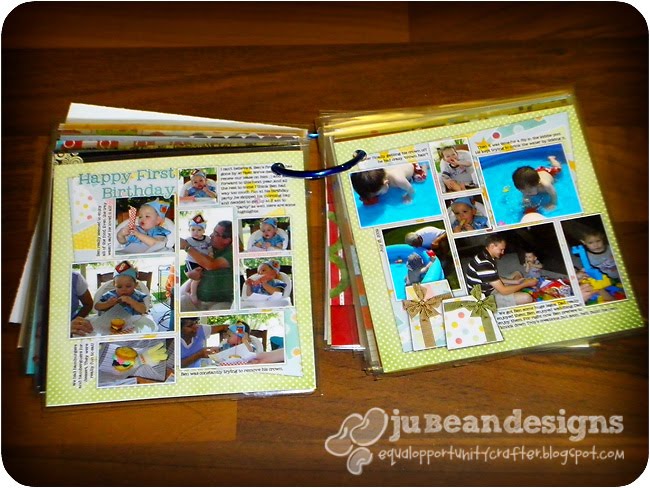
Hybrid - Using the computer to either create some elements/pages and printing that to layer on pages with other more traditional supplies.
page from a mini album. Used traditional paper, printed images and
elements. Typed out text and printed out.
Digital Scrapbooking - Using the computer throughout to create scrapbook pages including photo prossessing and using digital elements, fonts, pages, etc.
Double page spread created completely digital, from photo
processing to text to papers.


I mostly use a fully digital workflow when creating scrapbook pages but I know a lot of people like to mix it up. Now a days it seems to be getting harder to do anything with out using the computer at least as a tool (especially for photo processing)...so really everyone is at least a little digi! :)

There are other ways that technology can be used in scrapbooking. I use my personal blog to update family and friends about things we've done. Because I have such a bad memory I know that if I wait even a few weeks to scrapbook an event/moment I will probably forget some details. So my blog is like a journal which I can then pull from when creating pages. Plus, I can print a book copy of my blog to preserve the "in the moment" memories as well.

Why Digi?
For me Digi Scrapping provides me with the ultimate in control. I don't have to think too hard about what I'm going to do. I can try something, see what it looks like, and if I don't like it, get rid of it and start all over again.

When I used to scrapbook (pre-digi) my photos/spreads all looked the same...a standard size picture, or perhaps cropped a bit, with a mat, some embellishments and journaling. My pages were all big and bulky and would be quite expensive. Now that I'm Digital, my pictures can be edited/cropped/masked any way I want. I can use papers/elements over and over again (a cost savings) and the clean up is easy (save & close). I also love printing out professional looking photo books that look beautiful on my bookshelf and take up a lot less room.


Sizes of Printing
I create my layouts in 12"x12" but print photobooks that are 8.5"x8.5". I love using the large size because it gives me the greatest flexability - I can print in any square size. I'm toying with the idea of other aspect ratios but I really love the square look for my main (chronological) books. I'm also loving the idea of mixing and matching sizes (a la Ali Edwards) but that would have to be in a 3 ring binder with sheet protectors.


Ben's 2009 album printed in 4x4 size for a Mother's day gift to the Grandmas.
Tools of the Trade
Assuming* you are ready to go Digital (all or in part), your next question may be, "What do I need to get started?" (*By asking this questions I assume you have tool #1 - A willingness to learn. I'm also assuming you have a digital camera and a computer*)

  • Photoshop - at least Elements. This is the industry standard and you can find more tutorials about using this software than any other, which makes it easier to learn.
  • Photo/Digi-Supply Management - Figure out a plan from the beginning or this can get overwhelming. I use Adobe Bridge for my photos (stored chronologically) and Picasa (free from Google) for my digi-supplies (which are stored in folders, but are easier to view in Picasa).
  • Inkscape - optional. This is an open source alternative to Adobe Illustrator and is great for working with vector graphics. 
Beyond this, you could also get - hard drives, tablet, cricut (more for hybrid), and the list goes on. It all depends on what you're willing to invest $$$ and time into.

♥Julliana

My Evolution to Digital

I started scrapping in the late '90s while still in high school. I wanted to get all my baby pictures out of those old magnetic page protectors and into something acid free. My pictures were already starting to fade and I was only 16! I started for about a month using 8.5"x11" size and quickly changed to 12"x12" size - going back and redoing all the pages I'd done up to that point.
please disregard the dust!
From then on, my friends and I would get together every few weeks and scrap the latest events...dances, football games, etc. Since we were still film shooters, we didn't have a whole bunch of images to choose from so it was quite easy to stay "caught up". In college, I was the historian for an Institute committee and so I scrapbooked all our activities, and my own two. This is when I switched back to 8.5"x11". When we got married I inherited Troy's books that his mom and sister had made. Both were 8.5"x11" traditional.

Sadly, after being married, I didn't take many pictures...until I got a digital camera. Then I was really focusing on my professional images rather than family ones...until Ben was born. Then I started going crazy! For his 6 months of life I have over 10 GB of images!!! This is when I decided to go digital. Our house was still in the process of being remodeled (which it still is) and working on the computer just seemed easier. Plus I had already been doing this "digital scrapbooking" for my photography business. So that's how I ended up here, as a digital scrapbooker.

Comparing Different Albums:
Here's a sampling of some of the different albums I've made - you can see the difference in size and width. From Top to Bottom.

Mini Album for Troy: I made Troy a mini album as a wedding gift - "Ten Thing I Love About You". Its an 8"x8" Creative Memories album with 11 pages (2 sides each) and could expand to hold more.


I mixed some digital in with it...printed some pics from the web and used some type along with other elements. (Ask me how long it took to get all the calculator keys to create an equation - I was the 5th grade Krypto champ!)

Ben's First Year Album: I printed this 8.5"x8.5" photobook through Inkubook. Saying "first year" is misleading...this is his life in 2008 which is really only abotut 6 months of his life. It includes 27 pages (2 sided).
I love that I can create a cover as well.
I chose to go with the smaller size to make it easier to look through. The larger size (my HS album) is just so large and cumbersome to look through.

Our Trip to Brazil: We had so many pictures from this trip and I was so overwhelmed I knew I didn't want to scrapbook them...but I didn't want to forget what happened either. Here I settled on a simple photo sleeve album with some space for journaling. I love looking through this album and it was so easy to put together. Includes 50 pages with room for 4 pics each. I added some memorabilia too (tickets and such). This is definitely the easiest, albeit not the most creative, way to go.

My High School Album: 12x12 3 ring binder. Contains 24 sheet protectors (48 pages) and could hold maybe 1 or two more.


My Conclusion:
I've decided that digital scrapbooking is for me... at least for my chronological albums. I am, however, still excited about the idea of doing some hybrid/more traditional mini albums for events or trips.

♥Julliana